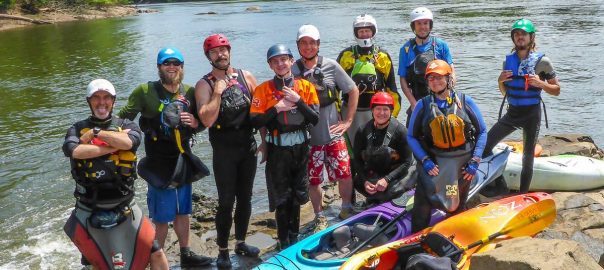
This summer, I had the opportunity to take part in a Level 4 Swift Water Rescue class, put on by several ACA members in Weldon, NC. It was a great experience and I learned a lot from the 3 course instructors, as well as from other members of the class.
If you haven’t been, Weldon NC is a great place for this sort of class(depending on the water level,) as there are several not-insignificant rapids, which fall into a relatively calm pool. So, once you make it through the rapids, there is very little downriver risk and you have plenty of time to enact a rescue or just float and recoup.
Largely to help me organize my thoughts and help the class sink in, the below are some of my takeaways from the class. While some of these are reinforcements of things I already knew/practiced, there are also a number of new thoughts/concepts for me.
About the Class
The class was put on with the support of the Carolina Kayak Club and Carolina Canoe Club. The instructors, Larry Ausley, Matt Thomas, and Allen Freeman, are well known names in the paddling community and all excellent white water boaters. Larry Ausley offers several classes/courses throughout the year, along with kayak training and assessments and coaching.
Matt, Allen, and Larry were kind enough to spend fathers day weekend with us and teaching some important safety skills.
Minimum Required Safety Equipment
Once you go start going down the rabbit hole of gear, you can quickly end up with a quite expensive habit. Asking what gear someone has in their hatch can be kind of personal, but the following are some basic requirements for rescue:
PFD: This one is a no-brainer…you never go out on the water without one on your person(stuffed under your deck bungee doesn’t do you any good.) A rescue PFD, which has a harness builtin that lets you clip a rope to it w/quick-release is a good idea and the ONLY time you should clip a rope to your person is if you have a rescue PFD.
Helmet: A proper kayaking helmet(not a bike/skateboard helmet) is a must have for any sort of river(or ocean surf) work.
Whistle: Anyone out on the water needs to have a whistle/noise maker on their person. Attaching it to your pfd is best practices and it is important to get a water proof whistle. Whistles with balls in them will not work in water situations.
Shoes: You should always wear shoes, no barefoot paddling, and they should have sufficient tread to prevent slipping. I like booties, but they need to be thick and have a good sole. A general rule of thumb is that if you can’t walk across the ground and/or a gravel parking lot without paying attention to where you put your foot, they are too thin.
Carabiners: Having multiple carabiners is important. They should be of the locking type, as the non-locking ones can snag/catch on things. And of course, they should be proper climbing/weight rated carabiners. Generally, it is best practices to NOT put the carabiner on your throw bag, so your victim doesn’t get a half-pound chunk of steel to the face when you throw your bag. However, this depends on the situation and a rope when you need it is a rope when you need it(carabiner or no.)
Throw Bag: A proper throw bag with floating polypropylene rope is important, as you can quickly get it out to a person, as opposed to trying to untie a daisy chain or untangle a rope. Spend some time practicing throwing/bagging your rope, as you don’t want it to tangle when you need it.
Liability and Personal Risk
Disclaimer: I Am Not A Lawyer, Your mileage may vary, and you should research this on your own in relation to your state/country.
While there are some things that you always have to have when paddling, like a PFD and helmet, there are a lot of things that come down to the level of personal risk you are willing to accept. Some people don’t think twice about dropping off a 20 foot water fall, while others are content to paddle around on the lake. There is nothing wrong with either choice(provided you are skilled/equipped to do it,) so as a paddler, you have a responsibly to evaluate your own risk level and not push people beyond theirs.
In terms of rescue, it is safe to say that as a paddler, you have a moral obligation to help other paddlers in need and I think most people I paddle with would go to great extremes to help a paddler in distress(even one they don’t know.) However, this moral obligation should not overshadow your own personal safety and, as is the case in any sort of rescue action, the last thing you want to do is create more victims. So, the first priority of any rescue should be to maintain your safety and that of those who are not in distress. The victim comes last, but this does not mean they aren’t important, just that your primary goal is to keep yourself safe.
Of course having said that, sometimes you must risk yourself to help others, such as is the case of a live bait rescue, and also risk hurting the victim, so you need to carefully evaluate what sort of risk this is.
In terms of legal liability, the laws vary from state to state. Some states have duty to act laws, where you have a legal obligation to help someone. Others states, like North Carolina, have good samaritan laws that protect you as a rescuer if you are acting in good faith, but your rescue attempt doesn’t help and your victim becomes injured or dies. Generally, these are superseded by your own well-being, so putting yourself in undo risk of injury is never a requirement.
However, once you start helping someone, you can’t just abandon the effort. You need to finish the rescue attempt or continue trying until the situation is resolved, an agency(like fire and rescue) comes and takes over, or the person is dead. You have a duty to continue attempting to help the person. This is especially true when money is exchanged, such as a river guide situation, or you put yourself in the position of a trip leader. For this reason, sometimes it is best to add a disclaimer while doing the pre-run briefing, stating that you are not leading the event and that everyone should make decisions on their own as to whether they are comfortable at any part of the trip.
The Best Rescue is the One You Don’t Have to Make…Keep it Simple
The best type of rescue is the one that you don’t have to make, so before you get complicated and start rigging ropes, you should attempt to deescalate the situation. This may be as simple as just yelling ‘Swimmer, Go Left’ and directing them to shore. Or waiting for the swimmer to flush out of the rapid and collecting them in an eddy.
You always want to start simple and get more complex if your rescue attempt doesn’t work.
As a swimmer/victim, it is important to listen to the people around you, as they often have a better vantage point of what is going on. In the water, you have a very limited view and are often only focusing on yourself, but the people around you can see a lot more…so if they tell you to let go of your boat, you will often want to listen to them.
Objective and Subjective Hazards
In line with keeping things simple, being able to identify potential hazards, such as a really grabby hole, and avoid them is the first step to river safety. Subjective hazzards include things you have some control over, like the people you paddle with or the time you go out on the river(flood stage.) However, objective hazzards are things that are more out of your control, like strainers, downed treas, and water hazards.
Assigning Roles During a Rescue
There are a few different roles that should be assigned during a rescue. This includes the rescue lead, upstream/downstream safety, and then the actual roles of the rescuers.
The rescue lead(I can’t remember the actual term for this) should be able to step back and be assertive enough assign roles to other rescuers. When possible, they should take a step back and not participate in the actual rescue, but rather delegate responsibility to other rescuers. It can be hard to not jump in and start doing, so often it is a good idea to have the really gung-ho people be the ones preforming the actual rescue, like manning the throw rope or paddling out to get the rescuer, while the lead takes a step back and looks at the big picture of the rescue.
Upstream safety: When preforming a rescue, you are potentially creating other hazards for paddlers that are coming down the same rapid. This is especially true when you start rigging up ropes, as this creates a big hazard for people running the rapid. So, you should have someone move upstream and alert other paddlers that there is a rescue attempt going on.
Downstream Safety: You should always have one or more people downstream of the rescue so that if the rescue fails, you have another attempt, in addition to being able to collect gear, like boats/paddles, if it gets away from the victim. It can be helpful if they are close enough to the rescuers, so if needed, they can come and provide additional assistance.
Swimming

Photo by Larry Ausley
As the saying goes, everyone swims. There are two types of swimming aggressive and passive. When you are in a defensive swimming stance, you should position your head facing upriver and feet down river. Feet should be kept at the surface of the water to avoid foot entrapment. By having your feet downriver, you can use to deflect yourself off of rocks.
When you are ready to actually start swimming, such as when you see an eddy that you want to catch, you need to hit it and mean it. Switching to an aggressive swimming stance involves rolling your body over towards the direction you want to go. It is important to roll over, rather than bring your feet down, as you want to reduce the risk of foot entrapment as much as possible.
With any of these rescues, conserving energy is essential and often, when you are in a beater or swimming hard, you are expending a lot of energy. Switching from defensive to aggressive and back can be a way of conserving energy. But, you need to hit it and swim as hard as you can when you decide to make a break or try to ferry over an eddy.
When jumping into the river, you should keep your hands out and cupped in front of your face and try to absorb as much of the force on your pfd as possible. If you have gear, like a boat, this should be positioned downstream, so that it does not push ontop of you, creating a hazard.
Swimming and Strainers
The best thing you can do is avoid strainers, however if this is simply not possible, you should swim as fast as you can towards it and, using your hands, push your body up and over the strainer. Going under a strainer is incredibly risky and dangerous.
Wading
Wading can be an effective way of getting to someone or getting yourself out of a sticky situation. However, whether you can effectively wade depends on a few factors, like the rate of water flow, as well as how deep the water is. Generally, when the water is deep enough to get to your PFD, your ability to wade will be severely reduced, as the bouyancy of the PFD will lift you and reduce your footing. You should wade facing up river.
Using a paddle can be a good way to provide stability and by working with it, you can maintain 2 points of contact with the ground at all time(three when standing still.) The paddle should be turned sideways when moving it to prevent the flat part of the blade catching the water current and then can be turned sideways when you put it in the ground to provide more stability. Your paddle, along with your toes, should be used to feel around to find good footing, rather then just moving without thought.
When wading with multiple people, you should stack up behind one person, grabbing onto the back of the person’s PFD. Depending on how many people you have, this can take the form of a triangle, diamond, etc.
The person(s) in front can form an eddy for the person in back, so the shorter/less strong person should typically be placed at the back of the formation. Another way of wading involves creating a chain of people horizontally and then when it is time to move, one person passes behind the chain, holding onto each person as the progress. This way, you can do a leapfrog like movement across the river.
Pinned Boats and Gear
Anyone that seriously paddles likely ends up with a lot of money tied up in their gear, so its understandable that you want to hold onto it. However, this should not be at the risk of bodily harm. At the end of the day, sometimes you need to let go of your paddle or boat and work on saving yourself.
One thing to keep in mind in a pinned boat situation is that as soon as you pop your skirt, your boat will likely fill with water, which can turn a 50 pound boat in to a 500 pound boat. So, before you pop your skirt, provided you are in a semi-safe position to do this, you should attempt to un-pin your boat. As a rescuer, you may be able to come up next to the pinned boater and grab them, leaning across your/their boat. This will make the boat much more stable and give the person some time to work on un-pinning the boat, as opposed to just bracing to keep from going over. This may allow them to wiggle free.
If you are out of your boat and the boat is pinned by itself, you have some breathing room. The situation is usually de-escalated and no one is at personal risk, so you can focus on getting the boat out. In many cases, the only way to un-pin it will be to pull it back out the way it came, but sometimes tipping it one way will break it free. This really depends on how/where it is pinned.
If you can climb over from the other side and get a rope on the boat, you can often pull it enough to break it free. It often doesn’t take much to unbalance the pin, you just have to be able to identify the type of pin and where the force is coming from.
Throw Ropes
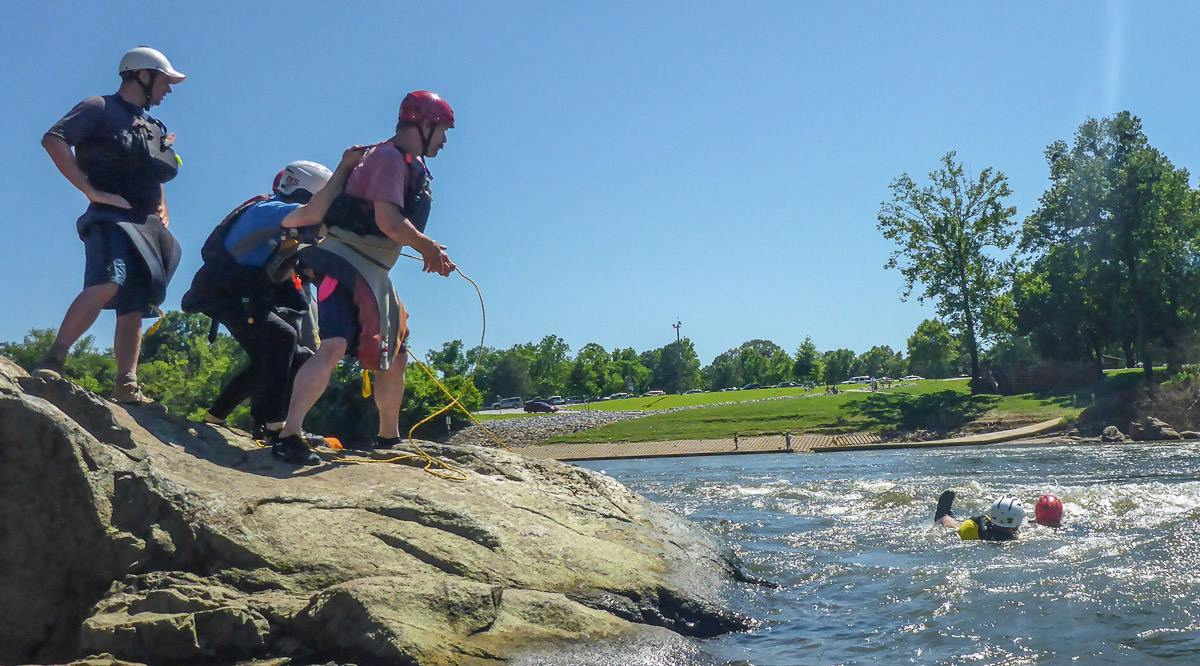
Photo by Larry Ausley
Having a rope bag is essential. There are a few different types and having a small/short one on your person, with a larger one in your boat is probably a good idea. The larger(thicker) the rope is, the easier it will be to grab. It is important to have a polypropylene rope, which will ensure that the rope floats. Paying attention to rope weight capacity is also important, as when you start pulling a boat full of water or using mechanical advantage, it is possible to overload the rope.
The type of throw you use largely depends on the situation, however I’ve found that I work best with an underhand throw. However, this is not always possible, like if you are in water, so you should practice with both hands(left/right,) overhand, underhand, like a football, etc.
When throwing the rope, you should assume a belay stance, which involves having the rope run behind your back, allowing for you to keep it from moving. The rope/bag should be positioned so that when the water takes it, it does NOT wrap around you. That is to say, the weight of the bag/victim, along with the rate of water flow, is going to push the rope downstream. The rope should not be positioned so that when it goes downstream, it wraps around your body. Instead, you should be able to release the rope if needed.
It is important to pay attention to what is downstream, as the victim is going to pendulum and you don’t want to put them into a worse position then they are. Sometimes this means playing out less/more rope to get them past an obstacle or in some cases, making the decision to let go of the rope.
When pulling someone in, if they are also pulling themselves up the rope, this can cause you to end up with a lot of slack. So, you may just want to hold the rope steady and let them pull themselves in.
Whenever possible, someone should provide support for the thrower, by grabbing the back of their PFD and getting lower to the ground. By grabbing the top of the PFD and positioning your forearms against the thrower’s back, you can provide a great deal of stability.
You aren’t always going to make your throw, so practice follow throws. One method of a follow up throw is to coil the rope up into two bunches and then throw the coils(holding onto one end of the rope.)
Live Bait
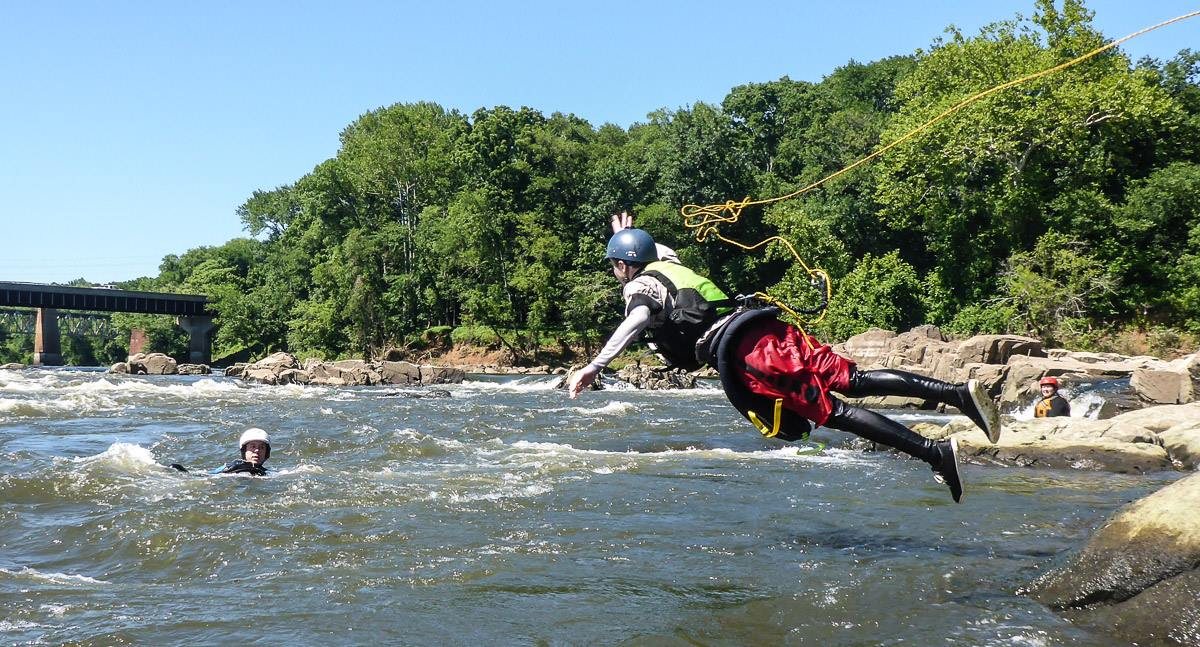
Photo by Larry Ausley
Live bait is when you clip a line to the back of your Rescue PFD and jump into the water to affect a rescue. You often see this in whitewater races, like the Green Race, where you need to grab the person before they hit another rapid or the person becomes injured.
There is a good bit of personal risk involved with this type of rescue, so it should not be a first resort in most cases. It is essential to have a rescue pfd to preform this type of rescue. If you do not have a rescue pfd, you don’t ever clip a rope to your body. A Rescue PFD has a harness/ring in the back that you can clip a line to, which is attached to a quick-release. If you get into trouble, you pop the quick-release and break free.
The process of a live bait is pretty simple…generally you jump into the river and try to grab the person. In most cases, this involves getting a hold of the back of their PFD and then just holding them in place as the people at shore pull you in.
Holding some rope coiled in your hand is important when jumping, so that you have some slack. Like most rescue techniques, communication is essential, so you should yell to alert the victim that you are coming for them.
This is an extremely risky, but efficient means of rescue.
Mechanical Advantage
Using pulleys, you can rig up a mechanical advantage system, which can provide you with a three-to-one advantage…so 10 pounds of force becomes 30. Just wrapping the rope around something offers some advantage, in addition to preventing slipping, but for a 3-to-1 advantage, you probably need to make use of pulleys.
Selecting a good anchor point is important and in some cases, you may want to use two. If you are hooking to multiple points, including when pulling a boat out, you never want to create a triangle, as this doesn’t distribute the weight properly.
Climbing anchors can be a useful tool to have in your kit, as they can slide into rocks/crevices and provide an anchor point in the middle of the river, where otherwise you would be unable to hook to anything.
However, with mechanical advantage and anchors, you need to worry about if the anchor/rope fails, so should set it up in a manner that if it does, the rope/rig does not come and hit you in the face.
While quite effective in terms of force ration, suing mechanical advantage takes a good bit of time to setup and is complicated, so is not often used for most rescues.
Foot Entrapment
One of the most dangerous, aside from strainers, risks to a paddler is a foot entrapment, which is where your foot becomes caught in a rock or other tight place. In most cases, depending on the water flow, this will force the person’s face into the water and presents a huge drowning risk. In these cases, you have seconds or minutes at most to get their head back above water.
If it is possible to grab the person’s body to get them above water, this is a good first step. Otherwise, get a person on both sides of the river and a rope across their chest in order to hold their head above water. This gives you some breathing room to affect an actual rescue and may give them the time to rescue themselves. This is called a stabilization line and is an important first step that needs to be enacted as quickly as possible. In addition to simply holding the person up, the victim may also be able to hold onto the rope to support themselves.
Running a second rope by their feet can be used to attempt to free their leg and it is also possible to get a bit more complicated and use three ropes to create a sort of lasso around the person, which will allow you to pull them out. This is called a cinch line, but requires a lot of practice to get right. As a last ditch effort, you can try to wrench them free by jumping into the river or as a live bait, which has a very big risk of personal injury, however a broken foot is better then a drowning.
Communicating Across the River
Since you often can’t speak to someone, especially if they are across the river, there are a number of non-verbal commands you can use to communicate when you can not be easily heard.
Patting the helmet: Okay, I’m Ready, I Understand
Paddle held horizontally across the head: Stop, do not continue.
Paddle held vertically above the head: Everything is okay, come to me, we are good now.
Paddle Pointed Left: Go Left
Paddle Pointed Right: Go Right
One Whistle Blast: Look at me, pay attention to me
Three Whistle Blasts: I’m in trouble, alert.
Conclusion
This was an awesome first class and I really learned a lot from all my instructors. As is always the case, just being around experienced paddlers can be an awesome way to skill up and get some knowledge and this class was filled with great paddlers.
I think this covers the main things we went over, but we also learned other stuff, like several types of knots and boat recovery, which are useful to have in your swiftwater rescue toolkit.
While I still have a lot of learning to go and am in no way as experienced as I want to be, I feel much more comfortable in my abilities now. Simply being able to practice some of the things I already knew, like proper swimming technique, in a safe environment is invaluable, so I am sure this is the first of several classes I will take on river safety.